Welcome to Lines, Dots, and Doodles. This is the place for students, parents, and teachers to find out what has been going on in my art class. I have included pictures of my student's artwork and basic explanations of the projects. I hope when you leave this blog, you feel inspired to create. Feel free to browse this blog and borrow any of my art lessons.


Friday, October 30, 2009

Aztec Suns, 1st Grade


To begin this lesson, I showed students the Aztec Calendar (which is in the shape of the sun). We talked about how important the sun was to the Aztecs. My first graders loved looking at this and noticing how different it was from the typical suns they draw. We then created our own suns on black paper.
Basic Directions:
1. Have them draw a small circle in the middle of the page. Then draw a second circle around the small circle. Keep drawing circles around each other until they have four circles drawn. Each circle should be a little bigger than the one before. (do this in a step by step instruction format, otherwise they won't understand).
2. In each row, they will draw a simple pattern. (could be squares, triangles, stars...)
3. In the center they may draw a face for the sun (happy, sad, scary, it doesn't matter)
4. Color everything in with oil pastels.

Sunflowers, 3rd and 4th Grade


This is a wonderful time of year for sunflowers. If you can bring real sunflowers into the classroom, that is even better. Many of my students haven't ever seen a real sunflower, since I teach in the suburb of D.C. I taught the students basically how to draw the sunflower and then had students color with oil pastels. I encouraged students to use analogous colors and blend them together with their fingers. (They always love doing this). If they do it right, it looks almost like paint. The backgrounds were painted in watercolor.

Art on a Cart

Alright, so teaching without a classroom and without a place to store your supplies can be frustrating. However, I have made it work for myself. Here are some hints that I wish I would have known before taking this job.

1. Just because a classroom has a projector, smartboard, or visualizer, doesn't mean it actually works or that the teacher has it set up. I always come to a class prepared for anything. Always have an actual hard copy of visuals, and not just digital images. (if I can't get the technology to work in about 2 minutes, I move on with plan B)

2. Not all classrooms have a sink. Always have a bucket of water just in case!

3. Having students all wash their hands at the end of class is a waste of time. (Don't waste 15 minutes of class doing this) Always have wipes. Baby wipes are the greatest invention. I have my students first wipe their hands and then their table. One wipe per child.

4. Egg Cartons!!! I love them. I use the Styrofoam ones for tempera or acrylic paints. Once the paints are in there, they will last for about 3 days without drying out. If you need it to last longer, put a wet paper towel in before closing the lid. This will give you an extra day or two.

5. Cleaning paint brushes. With the older kids, I assign one or two children to wash them for me. Most elementary kids will want to help you with this. With the younger kids (like pre-K and kindergarten), I bring a bucket of soapy water with me and we put all the dirty brushes in it. I leave them there until I have time to wash them out later. Usually by the time I get to cleaning them, they are already half way clean from the soapy water.

6. Multi Task!! Do more than one thing at a time. For example, after I give students a step, I know I have a minute or two to get something done while they are working. I will use this time to fill up water cups, pass out supplies, or collect anything not being used anymore. Yes, at the end of the day you will be exhausted. (but it's a good kind of exhausted because you know the student's got as much as they could out of the art lesson).

7. My Cart. The cart changes sizes depending on which school I am at. I switch things on or off my cart depending on what lessons I am doing that day. Think through every aspect of a project. Always have pencils, glue and scissors on your cart. Just because students are suppose to have these things, doesn't mean they actually do.

8. I do not have drying racks. This is just a fact I have to live with. This doesn't stop me from painting with the kids. Anything that needs to be dried, I will usually find any open space in the classroom to put them. (Most teachers are okay with this). If for some reason you can't have them in the room, I will even sometimes put them on the floor in a hallway or under a stairwell. Just be creative and don't forget they are there.

9. Moving art supplies from one school to another is a crazy task. I load everything into boxes and label the contents. That way I can just leave anything I am not using in my car. I am not going to haul things all the way into the school if I don't need to that day.

10. The hot glue gun is your friend. If you need to hang up artwork in a school without bulletin boards, I hang up large sheets of paper with hot glue instead of tape. (Tape will fall in about a week or so). You do need to get permission from the principal to do this. As long as the walls are the bumpy stone walls, hot glue will peel right off without peeling the paint. Just use a paint scraper.

11. Expect the Unexpected!!! Being a nomadic art teacher just means you have to be flexible. Don't sweat the small things. Also, expect that life will be chaos. Nothing will ever feel organized, so learn to just have organized chaos. Go with the flow! In many ways, I like the fact that my days change drastically from one to another. Good thing I am not OCD. :)

Tornado, 4th Grade


My students seem to really love this project. They seem to love creating artwork about disasters. These are collages. The tornado is made of cotton batting and I show them how to form it into a tornado. Houses, cars, trees, flowers etc. are made completely out of paper. I ask the students to have at least one house, one tree, and one vehicle in their finished picture. The rest is up to them. In the last 15 minutes of class, I let them use oil pastels to add final details.
I found this lesson on one of my favorite websites, http://techyteacher.net/artlessons/fourth/tornado.html

Wednesday, October 28, 2009

Silhouettes, 3rd and 4th Grade


I did these last year. A few of my students have told me that this was their favorite project from last year. Fourth graders did a theme of the American Civil War. To create these, students used old photos of people and traced them onto black paper to make a Silhouette. It is extremely important that students cut neatly (some students will find this hard)


Third graders did the same project, but with a Fairy Tale theme. This project was on the verge of being to0 hard for third grade. They turned out cool, but many of them struggle with the cutting. This project definitely works better with older kids.


I love these. They turned out awesome. They would also make wonderful stories if you wanted to tie it into language arts.

Tuesday, October 27, 2009

Before and After Volcanoes, 5th Grade


Above: Before the volcano erupted


I did these last year, but I just love them. These are way cooler in person than in a photograph. Basically, I had students draw a before and after picture of a town with a volcano. On a piece of paper, students used oil pastel to draw a quiet town before the volcano erupted. Then a clear transparency was stapled on top. Gell markers were used to draw in the lava. This is the part students loved.

Monday, October 26, 2009

Ocean, Kindergarten

I spent some of last week turning the kindergarten hallway into an ocean. Above is a before picture. I painted the seaweed, coral, boats, etc but left out the fish.
My Kindergartners are adding the fish this week. As of right now, only two kindergarten classes have added fish. I can't wait to see the mural when the other four classes make their fish. These fish were made with oil pastel and water color.


Wednesday, October 21, 2009

Flower Stained Glass, 3rd grade


I did these near the beginning of the school year with my 3rd graders. The idea was to create a stained glass window with a wilted flower motif. I can not take complete credit for this project. I found it on one of my favorite websites, http://www.mrsbrownart.com/4th.htm. It is inspired after the wilted flower and stained glass windows in Beauty and the Beast.


Here are the basic directions:

1. Show students how to draw a wilted flower (I chose to show them a sunflower)

2. color it in with oil pastels (you could also have them paint it)

3. Use a ruler and a black crayon (or marker) to draw straight lines behind the flower

4. Paint the rest of the picture with watercolors


I think these are wonderful!!!

Pattern Cat, 3rd and 4th grade


My students seem to really enjoy this project. Overall, this project is fairly easy. I began the lesson by teaching my students to draw a cat. Then students filled their cats with really cool patterns. Everything was outlined with a sharpie and glued onto construction paper. I think these turned out Awesome!!!

Thursday, October 15, 2009

Fish, 1st and 2nd grade

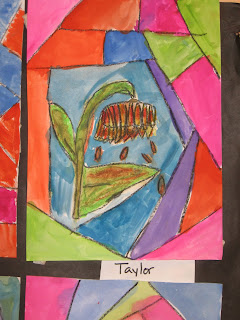
(Above: 1st grade examples)
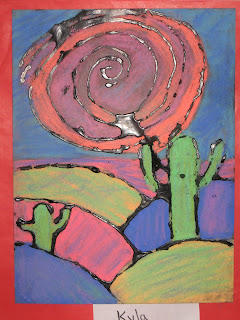

All kids seem to love Tropical Fish. I have done this lesson in both 1st and 2nd grade. First, we drew fish. Then we decorated our fish with lots of designs. These designs were outlined in oil pastel. Then the fish were painted with watercolor. The entire fish was cut out and glued onto blue paper.

For students who were done early , I let them add sea weed, fish, treasure chests, or anything else that can be found in the ocean.


(2nd grade examples)


Inuit inspired masks, 5th Grade

These are Awesome!!!


I was specifically asked by one of the fifth grade teachers to create a lesson on Inuit masks, since he was going to begin a unit on the Inuit culture. This is what I came up with.
These are entirely made out of paper. I stressed the importance of symmetry and layering in this lesson. We viewed examples of Inuit masks and I showed them how many Inuit masks were decorated with simple shapes like ovals, squares, circles, rectangles, etc.

To make symmetry easier, I had students cut through two pieces of paper at once. This way they end up with two identical images. When students were finished, some stapled raffia on to the mask for hair.

Monday, October 12, 2009

Native American Patterns. 5th grade


Sorry, these photos are a little fuzzy, but I think you get the jist. Basically, we talked about Native American Patterns and I especially focused on their bead work. I took a blank grid and had students create their own simple patterns that could be repeated over and over.
Some students love this, but some do not. It takes a lot of thought and planning. It's great for students with more mathematical minds though. It is extremely important that students color neatly inside the grid. (I photocopied the grid from a Native American beading book I own.)

Crayola Doesn't Make A Color

I found this song a few weeks ago on youtube, and now I am in love with it. This is an adorable song. This music video was filmed with real 2nd graders. My students thinks it's a great song. http://www.youtube.com/watch?v=EELEjeYzfjM. Just click on the link and enjoy.

It's not my fault if this song gets stuck in your head. :)

Friday, October 9, 2009

Lizards, 3rd Grade


I absolutely love these!!!

I taught students how to draw lizards. Then students used soft pastels to color. I encouraged students to use analogous colors (colors next to each other on color wheel) and blend them together. Finally, we used black glue to outline everything again. This is the hardest part. Make sure students are actually touching the glue tip to the paper or it becomes a mess. (I mixed Elmer's glue with black tempera paint to make this)


The basic idea for this lesson came from http://deepspacesparkle.blogspot.com/. It is one of my favorite places to get ideas.

Friendship Quilts, 1st grade


1st graders have been learning about friends. We created friendship quilts. Each child did one piece of the quilt. Students cut wavy, straight, or zig zag lines for the background. These were suppose to be place either horizontal or vertical on the square. On top, students traced and cut out people to represent their friends.

Wednesday, October 7, 2009

Scarecrows, 1st grade


I love these scarecrows. I can not take full credit for this project, I found it on one of my favorite blogs, Deep Space Sparkle. I had to adapt this lesson a little though in order to get it done in one hour.

Autumn Trees, 5th Grade


This lesson was all about teaching the students a little atmospheric perspective. Things close to you are larger, things far away smaller. Also, we discussed that having the trees go entirely off the top of the page will make it seem that you are standing right in the middle of the forest. We drew everything in pencil first and then colored with oil pastels. The sky and the grass was painted with watercolor.

Students love oil pastels!!! I truly think it is their favorite thing. Some of my students call them painting crayons. They love to put colors on top of each other and blend it together with their fingers.

Midwestern Landscapes, 4th Grade


I did this lesson with the fourth graders last year (when they were learning about different regions of the United States.) We talked about the idea of a birdseye view and how the land is split into segments when looking from above. The patterns represent the different types of crops the farmers grow. These were drawn with oil pastels and painted with watercolors.

Southwestern Landscapes, 4th grade


I really like how these turned out. These were done on black paper.

1. show students how to draw hills (draw line on left side to bottom, then switch to the right side). Alternate sides until you get to about the middle of the page.

2. Draw in a expressive sun

3. Show students how to draw the cactus

4. Use chalk pastels to color in the drawing. Mix colors and blend with your finger. (I explain the concept of analagous colors to my students)

5. Use black glue and outline everything. It is important to use the glue like a pen and actually touch the tip to the paper. ( I made the glue by mixing black paint into Elmer's glue).