Welcome to Lines, Dots, and Doodles. This is the place for students, parents, and teachers to find out what has been going on in my art class. I have included pictures of my student's artwork and basic explanations of the projects. I hope when you leave this blog, you feel inspired to create. Feel free to browse this blog and borrow any of my art lessons.


Tuesday, October 25, 2011

Tornadoes, 5th Grade

This is a fun tornado lesson that I did with my fifth graders. I've done this lesson before, but it has been a few years.
This is a very simple lesson. Basically, we used cotton batting to form the tornado. Then we dug into my scrap paper box to create the rest of the picture. During the last 10 minutes of the lesson, I handed out oil pastels to add details. I just love the creativity in these pictures.

Monday, October 24, 2011

Blue and White Plaster Bowls, 4th Grade

These were made using plaster gauze, and a plastic bowl for a mold. The great thing about plaster is that it dries really quickly. This entire lesson was done in one 75 minute class. To begin, I have the students rub liquid dish soap inside the plastic bowl. This helps keep the plaster from sticking to the bowl. Then, we dipped plaster gauze strips into water, and laid it flat into the bowl. I had my students do 3 layers of plaster gauze inside their bowls. Next, I had my students use blue paint to create a design inside their bowl. Because of time restraints, I had them do this while the plaster was still slightly damp. I let these dry overnight before popping them out of the mold. Lastly, I sprayed them with a clear sealer to keep the paint from chipping. I absolutely love plaster gauze, and will have to come up with other uses for it in the future.

Leaf Prints, Kindergarten

This is a very simple project that I do every year with my kindergartners. For this project, we used real leaves. To do this, we painted the back of the leaf. Then we turned it over, and stamped it to the paper. For the background, we used a sponge and tempera paint.
These turned out great, and look even better in person.

Friday, October 7, 2011

Patterned Owls, 1st Grade

This is a very simple and adorable project. I began by teaching my students to draw an owl (they used black crayon for this). Next, I gave them oil pastels to draw patterns inside their owl. (Pastels were also used to draw stars). I then gave my students red, yellow, and orange liquid watercolors to paint their owl. Lastly, they were given black watercolor for the sky.


These are super cute!


Thursday, October 6, 2011

Flowers in a Vase, 1st Grade

This is my second time posting on this lesson. I did this lesson with 3rd graders just a few weeks ago. I liked the results, so I decided to try it with my little 1st graders. I originally found this lesson on Deep Space Sparkle. I began this lesson by teaching my students how to cut and draw a symmetrical vase. The designs on the vase were drawn with a Qtip and blue paint. Lastly, I taught my students several ways to paint flowers.
I think these turned out nice.

Wednesday, October 5, 2011

Volcanoes, 5th Grade

I found this really cool artist online recently. Her name is Margarate Godfrey, click on the link to see her blog. I used this artist as inspiration for a volcano lesson with my fifth graders. Here is what my fifth graders created.For the volcano, we used scraps of construction paper and tissue paper. These were collaged and glued to the paper. The lava was made with liquid water colors. We used a straw to blow the liquid watercolors. This made the liquid watercolors spread in random directions, which looked more like real lava. The sky was then painted with blue and purple watercolor paints.

Tuesday, October 4, 2011

Silly Skeletons, 2nd grade

Last week, I had my second graders create Silly Skeletons, which was perfect timing because they have recently been studying the skeletal system in health class. This lesson could also be tied into Halloween or the Day of the Dead.
I began by having my students draw a skeleton with a white pastel. After the skeleton was drawn, students used white tempera paint to paint the skeleton. Lastly, students decorated their skeletons. My only rule was that these skeletons had to be silly and not scary. They were not allowed to add blood or guts.
I think these turned out GREAT!

Monday, October 3, 2011

Fruit Still Life, 3rd Grade

I found this really fun lesson on Art with Mrs. Smith. (I had to adapt it a bit to make it work with third graders, but the idea is mostly the same). This lesson was inspired after Frida Khalo's Still Life with Parrot and Fruit.
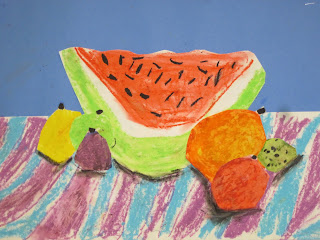
For this lesson, I wanted to focus on analogous colors and color blending. We used oil pastels for this lesson, which is wonderful for blending colors. When drawing the fruit, I asked the students to use three colors. I had them first choose the main color for their fruit, and then its analogous color. For example, if they were coloring an orange, they would use orange, yellow, and red. I then asked them to blend these colors together by smearing with their finger.
After the fruit was drawn, I had them cut the fruit out and lay it onto their paper. I encouraged them to overlap some of the fruit, to make it look like one was in front of the others. After gluing these to their papers, I had them use a black pastel to create a small shadow under the fruit.