Friday, May 27, 2011

Salmon, 4th Grade

My fourth graders recently read a story called Salmon Summer in their English class. To tie my art lesson into this, I had my students look at Native American salmon art. Native American salmon are very decorative and expressive. I found many examples of salmon art by searching in Google images.
For this project, I had my students draw their own expressive salmon. These salmon included interesting designs and patterns. Students drew everything with black crayon, and then painted with yellow, red, and orange watercolors.
I am quite impressed with the results of this project.

Friday, May 20, 2011

Bottle Cap Mural


The bottle cap mural is now on the wall and looks wonderful. This mural is brightening my art room.

Wednesday, May 18, 2011

Bottle Caps Everywhere

Today was the first day of my bottle cap mural project. Today I did this project with two 5th Grade classes. For the past few months, I have had my students collecting bottle caps. Several wonderful fifth graders volunteered to help me sort them by color. Yesterday, I drew the design and created this key. We did this project in color by number format.
Originally I planned to do this project on wood using screws, as I have seen done on many sites. However after looking into the price of screws and wood, I decided to use things I already had. We created this mural on foam core and adhered the caps using hot glue. It's hard to see in this photo, but this mural was divided into 6 pieces, one for each table. Each table had one glue gun, and we rotated to insure everyone had a chance to glue. This worked well because everyone was able to help with the mural.
I was quite surprised how quickly we finished this mural. I had two fifth grade classes today, each an hour long, and we finished this entire mural in one day. There are still three more fifth grade classes, so it looks like I will have to have create one more mural, so that everyone has a chance to do this project.
I haven't quite figured out how to hang this mural yet. Since it is on foam core and not wood, I am not sure the best way to adhere it to the wall. If you have any suggestions, I would love to hear them.

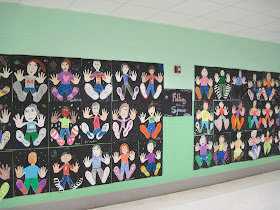
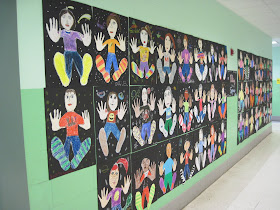
More Falling Through Space

I know I have already posted on this lesson, but I finally got all of them hung up. I just LOVE the way they look on the wall.

Sunday, May 15, 2011

Space, 1st Grade

I have been doing a lot of space themed lessons recently. This is my first grade space project. Basically, my students used a black crayon to draw planets, stars, moons, suns, aliens, etc. Next all of these things were colored with oil pastels. I emphasize the importance of coloring neatly and dark, since the paint will stick to all things that are left as plain white paper. Finally, I gave my students blue and black watercolor paints to paint the sky.
I think adding a little blue in the background, makes these space pictures look more authentic.

Saturday, May 14, 2011

Space, 2nd Grade

Recently I had my second graders created these beautiful space pictures. To begin, I had my students draw small white stars onto black paper. Next, students drew planets, space ships, aliens, ect. on white paper. These were then cut out and glued to their black paper.
My students love this project every year. I swear my students have more knowledge about space than I do. Throughout this project, students were telling me random facts about planets, stars, and NASA.
This very simple project had wonderful results.

Thursday, May 12, 2011

Starry Night, Kindergarten

I have done this project before, and every year I love the results. I always do this at the end of the year because my Kindergartners really don't have the motor skills needed until then. I begin this project by showing Van Gogh's Starry Night. We discuss color and brush work in his painting. To start their artwork, I have them draw stars, a moon, and wind onto their paper with oil pastels. Next, I hand out purple and blue watercolors, which they use to paint the sky. The houses were done on black paper, which were cut out and glued to their painting. I really love the movement in these paintings.

Wednesday, May 11, 2011

Annapolis Paintings, 4th Grade

These beautiful paintings were created by my fourth graders. They recently went to Annapolis for a field trip, so I thought it would be fun to do a painting of it. For this project, I handed out a photo of Annapolis. The photo had boats in the foreground. It had buildings, trees and the capital in the middle ground, and, of course, the sky in the background. Before beginning this project, we talked about simple overlapping to create depth. Judging from these pictures, I think they understood the concept.
Students began by drawing in pencil. After this, students used oil pastels to color the boats, houses, and trees. Lastly, students used watercolors for the water and sky.
These are beautiful and make me think of summer.

Sunday, May 8, 2011

Shapes, Kindergarten

Recently, I needed a quick simple lesson that I could do with my kindergartners. While searching the internet, I found this wonderful lesson from Laugh Paint Create. This was perfect timing because my little kindergartners have been learning about shapes in math class. This was a really simple lesson. I gave each table a pile of pre-cut shapes, which students pieced together to create houses, boats, waves, etc. For the bridge, I just photocopied it onto construction paper, and then had my students cut it out. Before gluing, I had my students design their pictures by laying their shapes onto black paper. They were not allowed to glue until they had my permission. (This makes them think before gluing).
I just love the way these look when hung together.

Saturday, May 7, 2011

Flowers, Pre-K

This week, my Pre-K students painted flowers. A few weeks ago I did a similar lesson with kindergarten. I liked the results so much that I decided to try it with Pre-K also.
This is a fairly simple lesson. I gave each child stamps to create the petals. Instead of a stamp pad, I had sponges filled with paint. This helps keep them from using too much paint. The grass and stems were done with green paint and a Q-tip.

Tuesday, May 3, 2011

Falling Through Space, 5th Grade

This is one of my favorite projects, and my fifth graders look forward to it every year. This lesson is a wonderful way to teach the concept of foreshortening. Quite a long time ago, I found this lesson on Oodles of Art, and I have used it many times since. My students start by tracing their hands and feet. After this, they draw their head, neck, arms, and legs. I then have my students outline everything in black marker and color with oil pastels. Next, I have them cut the entire thing out, and glue it to large black paper. Stars and planets are drawn with oil pastels.We really have to rush in order to get this project done, in our 75 minute art block. I usually warn my students that they will have to work harder in this one class than they ever have before. Most of them will work extra hard because they LOVE this project. For those of you who are fortunate enough see your students every week, you will want to dedicate several classes for this project.

I absolutely love the way these look when they are hung together!

Monday, May 2, 2011

Sunflowers, 1st grade

Sunflowers are my favorite flower, so I just LOVE this lesson. If you haven't guessed already, this lesson was inspired from the many sunflowers painted by Vincent Van Gogh. I found this really cool lesson idea on the blog How Beautiful You Are


To begin this project, I gave each child a piece of brown construction paper. With a black crayon, I had my students draw their sunflower. Next, I had my students use their finger to paint the dots in the middle of the flower. (It's not often I let my students put their fingers in the paint, so they really enjoyed this). The flower pedals were done with a paint brush. For this part, they used two colors at once. They first put their paint brush in yellow, and then dipped it staight into the red. My students marveled when it turned orange on their paper. To finish, my students painted the stem green, and the sky blue. Some students chose to put a little white on top of the blue to lighten it up.

These paintings make me think of summer!

Sunday, May 1, 2011

Covered Wagons, 2nd Grade

Recently, the second grade teachers asked me to come up with an art project related to the Oregon Trail. This is what I came up with. The wagons are made of milk cartons, which are cut in half. We painted the carton with brown tempera paint. The cover to the wagon was just a piece of paper, which we slid into the carton. I let my students decorate the wagon covers with crayon. I know, the real pioneers did not have colorful wagons, but I decided that the wagons would be more fun this way. The wheels were just made out of poster board and glued to the wagon.
I usually try to stay away from "crafty" art projects, but I couldn't help myself on this one. They are really cute.

Cowboy Boots, 5th Grade

Recently, my fifth graders have been reading stories about the "Wild West," so I thought this was the perfect time to create cowboy boots in art class. Judging by the wonderful results, I think my students enjoyed being "boot designers."
I began this project by showing my students lots of examples of cowboy boots. Cowboy boots come in many different styles and designs. I found many great examples of cowboy boots by just doing a search in Google. To create our cowboy boots, I had my students first draw their boot in pencil. After everything was drawn, they then outlined with a black crayon. Lastly, we used liquid watercolors to add color. This was a very simple project, but the results were quite wonderful. I definitely wish I owned a pair of cowboy boots (especially if they looked like one of these).